Thursday, December 20, 2012
Saturday, December 1, 2012
1/2" Paper Strip Christmas Ornament
One video down...one to go. :0)
I hope you aren't to distracted by my kitten, Titan, climbing all over me while we are taping. It has become increasing difficult to do any paper crafting let alone video tape a project! At least the kittens are FUN!
I have seen this ornament made a couple of ways. I did mine like Frenchie Martin of Stamping With Frenchie. If you ever need a quick bit of inspiration she has so many wonderful cards, 3-D projects and lots of videos to watch!
I think I will have to give up on posting the second video till tomorrow morning. Hope you will check back to see it. Very fun Christmas tag! Hint: I LOVE how I made Santa's belt buckle!
Take care and Happy Stamping!
Till my next post...
Sunday, September 9, 2012
Back To Stamping...Life Is Good!
Well, I sure have taken a hit health wise but I'm beginning to see the light at the end of the tunnel. Today is going to be my first day out that isn't a doctors appointment. Yeah!
I meet for a card swap. Some people like me make more than one set so you get more cards. I'm never disappointed. Everyone is so talented!
So here are my 3 cards I made for today. Hope you like them.

 I used all Stampin Up supplies except where noted. This card is done with Wisteria Wonder and Lucky Limeade. The stamps are from Nature Walk and Curly Cute. Wisteria Wonder Bakers Twine and Brad. I used a Sakura Clear Star pen to add some glitter to the flowers.(I wish it would have shown better on the pic)

This fun card is made with Early Espresso and Calypso Coral. The stamps used are from Reason To Smile and Wacky Wishes(love this fun new hostess set). Clear Itty Bitty Buttons tied with Early Espresso Bakers Twine. I used pop dots to lift the flowers in three different heights.
Last but not least my favorite of the three. :0)


Isn't this the cutest! I used stamps from Aviary and Tiny Tags. The colors are Early Espresso and Pool Party. The print paper is actually from the new Christmas paper pack called Festival Of Prints(who says you have to always use it for a holiday card). I used the Framelits Dies along with the Paper Piercing Pack. I love how it gives you a pattern to pierce around the layer, I think it gives it a bit of texture to the card. I used Pool Party Bakers Twine and since I punched a small hole to thread it through the spot above the birdcage, I used a small clear crystal gem from Want To Scrap to cover it. I think it makes the card.
As always I wish you time to be creative but most of all time to stamp!
Till my next post...
I meet for a card swap. Some people like me make more than one set so you get more cards. I'm never disappointed. Everyone is so talented!
So here are my 3 cards I made for today. Hope you like them.


This fun card is made with Early Espresso and Calypso Coral. The stamps used are from Reason To Smile and Wacky Wishes(love this fun new hostess set). Clear Itty Bitty Buttons tied with Early Espresso Bakers Twine. I used pop dots to lift the flowers in three different heights.
Last but not least my favorite of the three. :0)


Isn't this the cutest! I used stamps from Aviary and Tiny Tags. The colors are Early Espresso and Pool Party. The print paper is actually from the new Christmas paper pack called Festival Of Prints(who says you have to always use it for a holiday card). I used the Framelits Dies along with the Paper Piercing Pack. I love how it gives you a pattern to pierce around the layer, I think it gives it a bit of texture to the card. I used Pool Party Bakers Twine and since I punched a small hole to thread it through the spot above the birdcage, I used a small clear crystal gem from Want To Scrap to cover it. I think it makes the card.
As always I wish you time to be creative but most of all time to stamp!
Till my next post...
Monday, July 23, 2012
Wonderful Memories


Then Kitty Karma got sick and he never left her side. Sadly we lost her in November of last year.


He was my cuddlebug. I never had a cat that liked to be held so much. He wanted to be where I was and would cry if he didn't see me. He also always came when I called him. We spoiled him rotten EVERYDAY we had him. I'm so glad we did. He was a joy everyday and he will be remembered as one silly, crazy, wild, head butting and loving cat. It's funny how quiet our house is right now. But not for long. I love cats and I just think no home is complete without at least one! :0)
Most of all I'm so grateful for the vets Dr. Lynn and Dr. Connell who saw both our cats (so very often) who tried every known medicine and compound. Took special care with Woody's surgery. For all the staff not for just the laughs but for the tears they shed with me. For every kind word and call to check on them. You gave us as much time with them as you could. For that we will always be in your debt. Plain City Animal Hospital is the BEST!
This kind of took the wind out of my sails so to speak. Take care and I'll be back very soon!
Stamping hugs,
Shirley
Wednesday, June 20, 2012
Got Lobster???
If you would like to see how it should really look you can check out Lynn Pratt's website Stamp-N-Design, her August 5, 2010 post. It's much better than mine!
The second card is using the brayer techniques I learned from a class I took from Michelle Zindorf.


I hope you enjoyed the pictures as much as I did making them.
Till my next post...
Tuesday, June 19, 2012
What A Day We Had Yesterday!


As you can tell from the photo's we had a wild start of the day. Just last week we noticed our water pressure was bad and we thought it was the pressure pump that brings the water into the house from the well. (that's right we live in the boonies no city water here...just good old well water! LOL) But it turned out to be a worn out fitting at the actual well. That ended up being a easy fix.
Till my next post...
Wednesday, May 30, 2012
Quick Update On Lee & Some Flowerbed Pictures :0)

I thought I would add a few of the pictures from my flowerbeds. Of course I never got them finished(when Lee gets home from the hospital I can finish them off). I think some of the "weeds" are the prettiest flowers! :0) And how about our toad? Cool huh? We have a bunch of them and the little ones are so cute!!!


And now for an update on Lee. This morning the doctors got the test back from all his cultures. It turns out he has TWO infections running through him right now! No wonder he got sick so quick! Sadly, there is no oral antibiotic strong enough that would take care of the infections. So he will be in the hospital till he runs the course of antibiotics intravenously. :0(
Take care and thank you for all your well wishes. I have passed them all along to Lee. I will try to check all my emails later this evening when I get home. Bear with me I WILL get to all your emails!
Big Stamping Hugs,
Shirley
XOXOX
Friday, May 18, 2012
Lego "Cake" And Cards


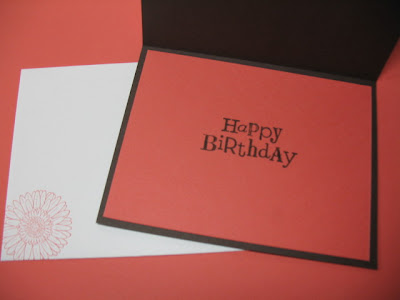
I cased the bottom card from a card on Splitcoast Stampers. I used the exact colors and set up with the exception my sentiment is different. Her's was an open Happy Birthday, with the letters all colored in the different bright colors of the Legos.
The cards were so fun to make and they really look so much better than my picture shows. I had tried to put the "dots of color" on the cake to make it look like Legos but it ended up looking so awful I just remade it plain.
Till my next post...Happy Stamping!
Tuesday, April 17, 2012
Unmounted Stamps: A Quick Overview & How To
I thought I would do an overview with a bit of a how to so you can use the stamps as they are. So don't feel you need to mount them to use them. :0)
Take care and as always I wish you time to be creative but most of all time to stamp!
Till my next post...
Sunday, March 4, 2012
Pansies Made With Butterfly Punch (Video Included!)


FIRST OFF: A BIG thank you to my sister Mary for taking the video of me! I have soooo much fun doing them with her! It's so funny, we do two trial runs and they go so well then we tape and something always starts me laughing...no wait it's my sister that makes me laugh!!! So please forgive the laughter. And I know I went a bit fast but I hope you can kind of follow what I did. ENJOY!
I was recently at the regional Stampin Up convention and they had a demo of the flowers made with the butterfly punch. I had seen a video of it done a bit differently by Darlene on her you tube channel "itsaninkstampede". So I mixed the two together and came up with this type of punch pansy. I hope you will like it.
Now down to the nitty gritty of the card supplies and measurements.
I really like doing a gate fold card. Here are the basic measurements used in this card.
Take a 11 x 4 1/4-inch piece of cardstock and score lines at 3 1/2 inches from the left and 2 inches from the right.
Decorative paper cut at 3 1/4 x 4-inch piece for left side
Decorative paper cut at 1 3/4-inch piece for right side
Stamp image on piece measuring 3 7/8 x 2 3/8-inch white
then layer onto pieces measuring 4 x 2 1/2 inches then onto last layer 4 1/8 x 2 5/8 inches.
Remember to mount this piece on the left side only! I used pop dots to give it a little lift.
Supplies used(all Stampin Up unless noted):
cardstock: Shimmer White, Elegant Eggplant, Old Olive
Ink: Elegant Eggplant, Daffodil Delight
Marker: Elegant Eggplant
Ribbon: 1/2-inch scallop dots Elegant Eggplant
Sticky Tape
Stampin Dimensionals
Butterfly Punch, Bird Builder Punch(greenery)
Stamp Set: Word Play
IRock Tool from Imageinisce along with the crystals in clear(you could use a brad instead)
MY TIP FOR TODAY:
I also wanted to say using the "Tacky Tape" can be a pain when you peel off the pink covering. It seems to stick to everything. So when I am doing a project like this where I am using a lot of it. I use a scrap piece of paper covered with Scotch Brand Double Sided Tape. I cover the paper and then when I peel it off I just press it down onto the sticky surface! It makes it so much neater to work.
Friday, February 24, 2012
Stampin Up Regional Convention

I am so excited that tomorrow I am going to my very first Stampin Up Regional Convention. My hubby(Lee) already took on a dry run so I know where to go. It's pretty easy to find from my house. So I shouldn't have any problems. I've decided to dress comfortably so I can really enjoy the day. I will take my camera and get as many pictures as my camera will hold.
They have a card swap and all cards need to be made with all current Stampin Up products. Makes sense!
This is my card. I love how it turned out. I had started to 50 than did 50 more. I cut up enough to do another 50 but ended up not finishing them in time. So I will have 108 cards to swap! I can't wait to see the other cards.
Supplies used:
Sahara Sand ink, paper
Marina Mist ink , paper and 1 1/4 grosgrain stripped ribbon
Whisper White paper
Antique Brads
Sticky Tape
Adhesive snail tape
Stamp-a-ma-jig(I can't live without this tool!)
Paper-Piercing tool
Well, it's off to bed for me. Morning will be here in no time. Hopefully I will be able to sleep!
Take care and as always I wish you time to be creative but most of all time to stamp!
Till my next post...
Thursday, February 16, 2012
Spiderman Spiderman, cutest boxes in the land...Watch out! Spiderman!


I had so much fun making these for my nephews Valentine's Day party. He's getting to old for the little kiddy stuff. And this is his last year of these kind of parties. When did he get so big!

I had made a Batman box too but he really needed something red so Spiderman was the way to go!
I learned how to do these by watching videos from Tami White, Stampin Up demonstrator.

I also have to post this picture of one with really big eyes on the right(my first one I made). I am laughing as I type this!!! Lee looked at it and said "What is this? Spiderman's LUNGS!" I about fell on the floor laughing! Lee is so funny! And let's face it they look like lungs!
As always I wish you time to be creative but most of all time to STAMP!
Till my next post...
Red Theme Swap


1st card is mine:
I "cased" this card from Lisa(lisaadd) off Splitcoast Stampers website. I used a different sentiment and the decorative cardstock I used was red with pink dots. Since I wanted it to be white dots I just used my trusty Signo White Gel Pen to color over the pink dots so I got the look I wanted.
2nd card is by Mary(my sister):
She used a Coronado Island stamp on leather. Great Job Mary!
Take care and as always I wish you time to be creative but most of all time to STAMP! :0)
Till my next post...
Saturday, February 4, 2012
Spellbinders Grand Calibur Overview
I know this wasn't a very detailed video but I know all you have to do is go to You Tube and type in Spellbinder Grand Calibur and you will be blow away at all the cool ideas!
Thursday, January 26, 2012
Happy Birthday Barb AND Happy Australia Day!


Well, today is my sister-in-law Barb's Birthday and it's also Australia Day! I want to say a big hello and Happy Australia Day to my dear Aussie friend, Carly! Hope your day is wonderful!
Hope Barb will like this card I made her. I have to tell you now that she knows how to stamp and she is really good at it I needed to make sure my card was top notch! :0)
The supplies I used to make the card were from Carly(thank you again for the vouchers) They were:
Stamp Set: Milton & Co "Toby and butterfly"
Paper and brad from: Milton & Co "Milton"
I stamped the image with Tuxedo Black Memento. Colored in with bashful blue, wild wasabi. daffodil delight, blushing bride from Stampin Up. I used Copic markers for Toby in colors E31, E33, E35 and around him for depth I used C00.
The rest of the paper and ribbons were all from Stampin Up.
Cardstock used Whisper white, bashful blue, chocolate chip
chocolate chip and bashful blue satin ribbon
Other tools and items used:
Stampin Up Dazzling Details(like stickles)
Stampin Up dimensionals
Zot Dots size large to help keep the ribbons fanned out.
Spellbinder Nestabliites Lacy Squares Die
To cut and emboss using the dies: Spellbinder's Grand Calibur Machine(this is one amazing machine!)
The finished size of the card was 6x6.
As always I wish you time to be creative but most of all time to stamp!
Till my next post...
Monday, January 23, 2012
My Sister-In-Law's First Card!
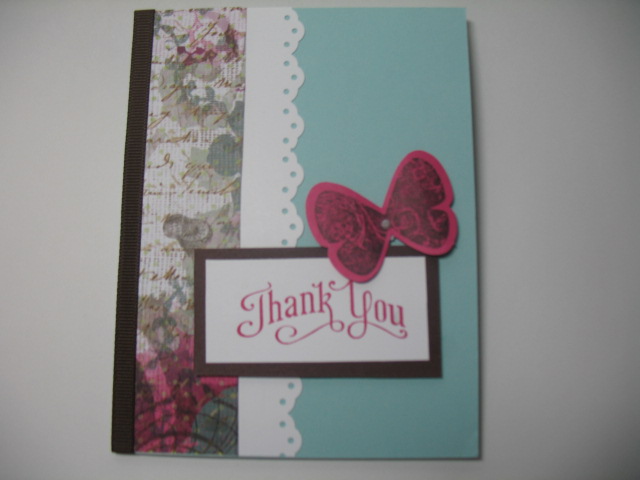
For Christmas my sister and I made up a rolling cart of stamping supplies for my Sister-In-Law(Barb) and her children. Will this is the thank you card she sent me. Can you believe this is her FIRST card!!! My sister said maybe you showed her too well. She'll be out doing you in no time! I think she's right! Can you tell she's a natural!
Barb didn't miss a detail. She really did a wonderful job tying together the colors in the designer paper. I love how she used the brown ribbon, brown cardstock layer and brown ink on the butterfly. The lacy ribbon edge, popped up saying and the popped up butterfly with the sweet little pearl center makes this card a real winner! I can't wait to see what she will come up with next.
As always, I wish you time to be creative but most of all time to stamp!
Till my next post...
Subscribe to:
Posts (Atom)