Tuesday, April 17, 2012
Unmounted Stamps: A Quick Overview & How To
I thought I would do an overview with a bit of a how to so you can use the stamps as they are. So don't feel you need to mount them to use them. :0)
Take care and as always I wish you time to be creative but most of all time to stamp!
Till my next post...


Sunday, March 4, 2012
Pansies Made With Butterfly Punch (Video Included!)


FIRST OFF: A BIG thank you to my sister Mary for taking the video of me! I have soooo much fun doing them with her! It's so funny, we do two trial runs and they go so well then we tape and something always starts me laughing...no wait it's my sister that makes me laugh!!! So please forgive the laughter. And I know I went a bit fast but I hope you can kind of follow what I did. ENJOY!
I was recently at the regional Stampin Up convention and they had a demo of the flowers made with the butterfly punch. I had seen a video of it done a bit differently by Darlene on her you tube channel "itsaninkstampede". So I mixed the two together and came up with this type of punch pansy. I hope you will like it.
Now down to the nitty gritty of the card supplies and measurements.
I really like doing a gate fold card. Here are the basic measurements used in this card.
Take a 11 x 4 1/4-inch piece of cardstock and score lines at 3 1/2 inches from the left and 2 inches from the right.
Decorative paper cut at 3 1/4 x 4-inch piece for left side
Decorative paper cut at 1 3/4-inch piece for right side
Stamp image on piece measuring 3 7/8 x 2 3/8-inch white
then layer onto pieces measuring 4 x 2 1/2 inches then onto last layer 4 1/8 x 2 5/8 inches.
Remember to mount this piece on the left side only! I used pop dots to give it a little lift.
Supplies used(all Stampin Up unless noted):
cardstock: Shimmer White, Elegant Eggplant, Old Olive
Ink: Elegant Eggplant, Daffodil Delight
Marker: Elegant Eggplant
Ribbon: 1/2-inch scallop dots Elegant Eggplant
Sticky Tape
Stampin Dimensionals
Butterfly Punch, Bird Builder Punch(greenery)
Stamp Set: Word Play
IRock Tool from Imageinisce along with the crystals in clear(you could use a brad instead)
MY TIP FOR TODAY:
I also wanted to say using the "Tacky Tape" can be a pain when you peel off the pink covering. It seems to stick to everything. So when I am doing a project like this where I am using a lot of it. I use a scrap piece of paper covered with Scotch Brand Double Sided Tape. I cover the paper and then when I peel it off I just press it down onto the sticky surface! It makes it so much neater to work.
Friday, February 24, 2012
Stampin Up Regional Convention

I am so excited that tomorrow I am going to my very first Stampin Up Regional Convention. My hubby(Lee) already took on a dry run so I know where to go. It's pretty easy to find from my house. So I shouldn't have any problems. I've decided to dress comfortably so I can really enjoy the day. I will take my camera and get as many pictures as my camera will hold.
They have a card swap and all cards need to be made with all current Stampin Up products. Makes sense!
This is my card. I love how it turned out. I had started to 50 than did 50 more. I cut up enough to do another 50 but ended up not finishing them in time. So I will have 108 cards to swap! I can't wait to see the other cards.
Supplies used:
Sahara Sand ink, paper
Marina Mist ink , paper and 1 1/4 grosgrain stripped ribbon
Whisper White paper
Antique Brads
Sticky Tape
Adhesive snail tape
Stamp-a-ma-jig(I can't live without this tool!)
Paper-Piercing tool
Well, it's off to bed for me. Morning will be here in no time. Hopefully I will be able to sleep!
Take care and as always I wish you time to be creative but most of all time to stamp!
Till my next post...
Thursday, February 16, 2012
Spiderman Spiderman, cutest boxes in the land...Watch out! Spiderman!


I had so much fun making these for my nephews Valentine's Day party. He's getting to old for the little kiddy stuff. And this is his last year of these kind of parties. When did he get so big!

I had made a Batman box too but he really needed something red so Spiderman was the way to go!
I learned how to do these by watching videos from Tami White, Stampin Up demonstrator.

I also have to post this picture of one with really big eyes on the right(my first one I made). I am laughing as I type this!!! Lee looked at it and said "What is this? Spiderman's LUNGS!" I about fell on the floor laughing! Lee is so funny! And let's face it they look like lungs!
As always I wish you time to be creative but most of all time to STAMP!
Till my next post...
Red Theme Swap


1st card is mine:
I "cased" this card from Lisa(lisaadd) off Splitcoast Stampers website. I used a different sentiment and the decorative cardstock I used was red with pink dots. Since I wanted it to be white dots I just used my trusty Signo White Gel Pen to color over the pink dots so I got the look I wanted.
2nd card is by Mary(my sister):
She used a Coronado Island stamp on leather. Great Job Mary!
Take care and as always I wish you time to be creative but most of all time to STAMP! :0)
Till my next post...
Saturday, February 4, 2012
Spellbinders Grand Calibur Overview
I know this wasn't a very detailed video but I know all you have to do is go to You Tube and type in Spellbinder Grand Calibur and you will be blow away at all the cool ideas!
Thursday, January 26, 2012
Happy Birthday Barb AND Happy Australia Day!


Well, today is my sister-in-law Barb's Birthday and it's also Australia Day! I want to say a big hello and Happy Australia Day to my dear Aussie friend, Carly! Hope your day is wonderful!
Hope Barb will like this card I made her. I have to tell you now that she knows how to stamp and she is really good at it I needed to make sure my card was top notch! :0)
The supplies I used to make the card were from Carly(thank you again for the vouchers) They were:
Stamp Set: Milton & Co "Toby and butterfly"
Paper and brad from: Milton & Co "Milton"
I stamped the image with Tuxedo Black Memento. Colored in with bashful blue, wild wasabi. daffodil delight, blushing bride from Stampin Up. I used Copic markers for Toby in colors E31, E33, E35 and around him for depth I used C00.
The rest of the paper and ribbons were all from Stampin Up.
Cardstock used Whisper white, bashful blue, chocolate chip
chocolate chip and bashful blue satin ribbon
Other tools and items used:
Stampin Up Dazzling Details(like stickles)
Stampin Up dimensionals
Zot Dots size large to help keep the ribbons fanned out.
Spellbinder Nestabliites Lacy Squares Die
To cut and emboss using the dies: Spellbinder's Grand Calibur Machine(this is one amazing machine!)
The finished size of the card was 6x6.
As always I wish you time to be creative but most of all time to stamp!
Till my next post...
Monday, January 23, 2012
My Sister-In-Law's First Card!
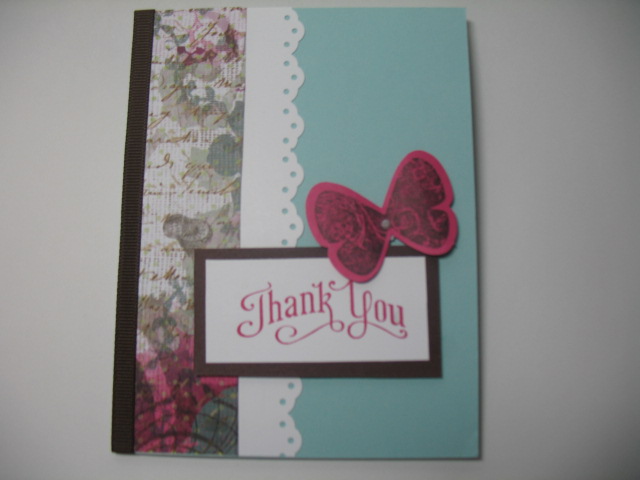
For Christmas my sister and I made up a rolling cart of stamping supplies for my Sister-In-Law(Barb) and her children. Will this is the thank you card she sent me. Can you believe this is her FIRST card!!! My sister said maybe you showed her too well. She'll be out doing you in no time! I think she's right! Can you tell she's a natural!
Barb didn't miss a detail. She really did a wonderful job tying together the colors in the designer paper. I love how she used the brown ribbon, brown cardstock layer and brown ink on the butterfly. The lacy ribbon edge, popped up saying and the popped up butterfly with the sweet little pearl center makes this card a real winner! I can't wait to see what she will come up with next.
As always, I wish you time to be creative but most of all time to stamp!
Till my next post...
Sunday, December 18, 2011
The Actual Shaker Card Video :0)
I finally figured out how to post the video. It took almost 5 hours to upload than get it on my blog...UGH!!!!
It's after 1am and I'm hitting the hay. Good Night All...or should I say Good Morning! LOL
You'll find on the info on the post before this one.
Till my next post...
Saturday, December 17, 2011
Shaker Card And Almost A Video
I don't think I was so clear on the instructions on the video but I hope you will be able to get the basics. I'm so worried about making the videos too long with basic stamping, layering or adding bows. So I try to have most of the pieces together.
I forgot the colors used to do the face, hands and legs. I used Blushing Bride marker for the cheeks and Copic #31 for the skin tone and the hair was done with Soft Suede marker.
Sorry about the spot where I start laughing. My sister and I had so much fun doing the video and if you listen carefully you will hear my husband (Lee) in the background laughing and saying "cut"! I guess you can tell I'm still learning how to do these videos. :0)
As always, I wish you time to be creative but most of all time to stamp!
Till my next post...
I forgot the colors used to do the face, hands and legs. I used Blushing Bride marker for the cheeks and Copic #31 for the skin tone and the hair was done with Soft Suede marker.
Sorry about the spot where I start laughing. My sister and I had so much fun doing the video and if you listen carefully you will hear my husband (Lee) in the background laughing and saying "cut"! I guess you can tell I'm still learning how to do these videos. :0)
As always, I wish you time to be creative but most of all time to stamp!
Till my next post...
Subscribe to:
Posts (Atom)