My journey to a happier & healthier life through crafting, cooking & lots of interests in between
Sunday, July 17, 2011
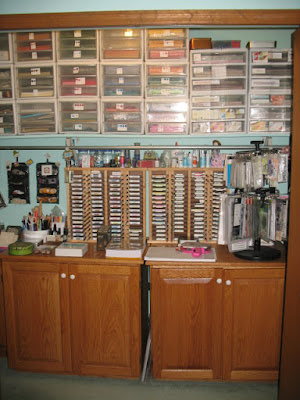
My Craft Area...The Before Pictures
As most of you know I have been moving around all the rooms in my home after we had some major renovations last year. (poorly done renovations I might add but then I digress. hehe) The pictures here are of how I had my stamping supplies stored. Half of everything was in a closet. (pictured above) Sadly tons of stuff was in boxes And the pictures of the room with the toys are now will be my stamping studio. Pictures of new stamp room coming soon.
I know one thing and it is, that I am unable to be creative in a cluttered mess. I need a place for everything and everything in it's place! :0) My new room is right next to my kitchen, I will have plenty of space and if I need a cutting area I can use one of the long kitchen counter tops. The key to my new stamping area is to always put everything away after I use it. Well, at least that's the plan! LOL!
As always, I wish you time to be creative but most of all time to stamp!
Till my next post...
Saturday, July 9, 2011
Cards For David...Weeks 9 and 10
Just a quick post of the cards I made for my brother for the last 2 weeks. Last week I sent the cattail card. I saw a similar card on another blog. I don't remember where but when I find it I will post it. I changed it a bit. She had the main image at an angle on the page but I just couldn't seem to get mine to look right that way. I also used different colors and shaded the background and around the edges.
I used old olive designer paper and stamped the sentiment(Hero Arts) directly on it with Early Espresso ink. Card stock used was Whisper White, More Mustard, Old Olive and Early Espresso. I used a reverse masking technique. You take a punch and use the punch out area(circle in this case) as a "stencil" to color in. After the moon was on I stamped the grass(Stampin Up) in Old Olive right over the moon. I used a punch(Stampin Up)to make the little "cattails" in Early Espresso cardstock. I sponged the main image with More Mustard and edged it with Early Espresso. Added the "cattails". I used mono adhesive and it dried tacky. OOPS! So I just punched out 12 more and added another layer and used a small amount of crystal effects to attach them. I liked it better because the cattails stand out more. So it's what I would call a happy accident. :0) I then layered the images used More Mustard brads and then used pop dots to lift up the main image.
The ice cream cards were so easy to make.(so sorry I don't know how to turn the pictures upright! ugh!) I followed a video on You Tube by "Chick N Scratch". She had some wonderful ideas. She used decorative paper for her "ice cream" but I used solid cardstock and highlighted it with ink around the edges. I also used the glitter red paper as a trim along the top of the cone. It just looked like something was missing without it. I made one for all the family. My nephews birthday is coming up this week so I thought I would take care of it all at once. I sent along a small ice cream maker, caramel and fudge topping, chocolate sprinkles, a brownie mix and a few dollars for ice cream and whip cream. I think it will hit the spot.
As always, I wish you time to be creative but most of all time to stamp!
Till my next post...
Subscribe to:
Posts (Atom)